
FAQ
1. What photopolymer plate thickness should I choose for my printing press?
The plate thickness must match your press configuration, including the mounting tape. A thickness of 1.14 mm is commonly used for flexible packaging and labels, while 1.70 mm is suitable for labels, paper cups and kraft paper. Plates of 2.54 and 2.84 mm cover various paper, board and flexible packaging applications, depending on the plate type.
Plates of 3.94 and 5.50 mm can be used on similar substrates, particularly corrugated board, with reproduction quality also depending on plate hardness, relief depth and printing conditions
2. What files should I provide for prepress preparation?
A production-ready PDF at actual size, colour specifications and manufacturing requirements provide a good starting point. If available, include a representative printed sample and technical information about the printing press and substrate.
3. How long does a flexographic printing plate last?
A flexographic plate can be reused for multiple print runs, but its lifespan depends on the plate material, inks, printing pressure, cleaning procedures and storage conditions. The total printed length is a useful indicator when considered alongside the plate's actual condition. Lifespan expressed only in months or printed metres is not sufficient to determine when replacement is necessary.
4. What screen ruling should I choose for my packaging?
Start by considering the substrate, ink transfer requirements and sensitive areas of the artwork. The selected screen ruling must preserve fine details while ensuring reliable reproduction of small halftone dots. A printed sample produced under actual press conditions is more valuable than simply selecting the highest possible screen ruling.
5. Which double-sided mounting tape should I choose for my flexographic plates?
Hard foam is generally preferred for solid areas, backing whites and line work. Medium Hard foam is suitable for mixed designs dominated by solid areas with some halftone elements. Medium Soft foam is better suited to image-heavy designs and gradients with limited solid coverage. Soft foam is preferred for fine halftones and highlights, helping minimise dot gain.
These guidelines should be adjusted according to the manufacturer's product range, plate hardness and printing conditions.
6. Is viewing a PDF on screen sufficient for colour approval?
A PDF can be used to check text, dimensions and artwork layout. Accurate on-screen colour approval requires a suitable calibrated monitor and properly controlled colour management. For a reliable physical reference shared between the customer and printer, a verified colour proof remains a valuable tool.
7. What is the purpose of backing white on transparent packaging?
Backing white provides a base beneath printed colours and influences their final appearance. Its coverage determines which areas remain transparent and which become more opaque. It must be prepared as a separate colour separation, taking into account the desired appearance of the finished packaging.
8. Why does my printed packaging look different from the colour proof?
A colour proof simulates defined printing conditions. Check whether the actual substrate, inks and press conditions match the reference. Then compare samples under controlled lighting and using consistent measurement methods to distinguish production deviations from differences in visual perception.
9. Why does the same colour look different in the office and on the production floor?
Lighting and the surrounding visual environment affect colour perception. When comparing a proof with a printed sample, use controlled viewing conditions, typically standardised D50 lighting in the graphic arts industry. Avoid approving colours by comparing samples under different lighting conditions.
10. What does “Passed” mean on a GMG colour proof?
It indicates that the measured control strip values fall within the tolerances of the selected reference standard. The report therefore documents the proof's colour accuracy for the verified criteria. Text, dimensions and file version must still be checked separately.
11. How can I reproduce the same colour on a repeat print run?
Keep the approved colour proof or printed sample, the original file version and production references, including substrate, inks, anilox rollers, printing plates and mounting tapes. During the next production run, compare measurements and actual press conditions with the previous run. This traceability helps identify deviations and determine the necessary adjustments.
12. Why are the edges of my flexographic plates lifting?
Start by checking surface cleanliness and dryness, any residue on the back of the plate, and the quality of the mounting process. Insufficient mounting pressure or moisture can weaken adhesion. Also verify that the double-sided mounting tape is compatible with the materials being bonded.
13. Why do solid printed areas contain small holes or missing ink?
These defects may result from poor substrate wetting, excessively fast drying, uneven printing contact, or a worn or clogged anilox roller. Check these factors before changing the screening configuration. A close-up photograph can help identify the specific type of defect.

14. Why are small text and reversed-out details filling in?
Excessive printing pressure, high ink viscosity or ink build-up can cause fine details to close up. Also check the condition of the printing plate and its relief depth. For water-based inks, monitor the pH. The diagnosis must distinguish between a defect already present on the plate and one that develops during printing.
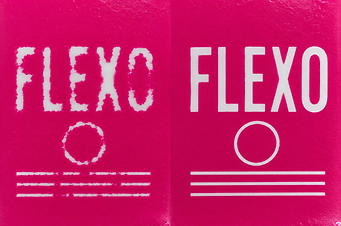
15. Why does the colour change during a print run ?
Variations in ink viscosity, anilox contamination or changes in ink transfer can cause colour shifts. Compare measurements with an approved reference sample and record the press settings. Immediately adjusting the ink formulation may conceal an underlying press stability issue.
16. Does increasing printing pressure improve ink density?
Insufficient pressure can cause missing print areas, but excessive pressure deforms halftone dots and may create halos. Aim for the minimum contact pressure required to achieve consistent printing. If ink density remains low, also examine the ink, anilox roller and ink transfer conditions.
17. How can I determine whether a printing defect comes from the plate or the press?
Compare the original artwork, the printing plate and the printed sample to identify where the defect first appears. Then check ink transfer, plate mounting and printing pressures. Photograph the defect, record production conditions and adjust one parameter at a time to identify the root cause.
18. What ink viscosity should be used in flexographic printing?
For some solvent-based flexographic inks, an indicative range is 18 to 25 seconds using a DIN 4 cup at 25 °C, with recommendations of around 22 to 25 seconds for doctor-blade systems. The correct value must be confirmed using the ink manufacturer's technical data sheet. These figures cannot be directly applied to water-based or UV inks, or to other viscosity cups.
19. Why does a defect appear when I increase press speed?
Press speed affects transfer conditions and the time available for drying. A configuration that works well at low speed must therefore be validated at the intended production speed. Record the speed at which the defect appears and check the relevant process parameters before modifying the plate.
20. Why do lines appear in the printing direction?
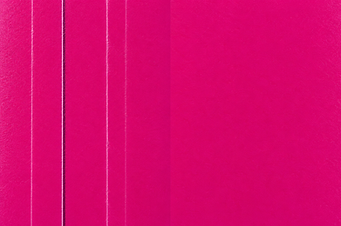
Longitudinal streaks may be caused by a worn doctor blade, dried ink, particles or a damaged anilox roller. Inspect the doctor blade, anilox roller and ink circulation system before concluding that the printing plate is defective.
21. Why do printed halftone dots have a darker outline?
This halo effect may result from excessive printing pressure or excessive ink transfer. Check the contact between the anilox and printing plate, as well as between the plate and substrate. Also verify the mounting thickness and ink transfer behaviour.
22. Can I use the same anilox roller for solid areas and fine halftones?
It depends on the required ink volume and the level of detail to be reproduced. An anilox suitable for large solid areas may deposit too much ink on small halftone dots. Evaluate its screen ruling, cell volume, cell geometry and overall condition before selecting a common configuration.
23. Can I use the same screening configuration when changing printing presses?
The existing configuration provides a starting point, but its suitability must be verified. The anilox roller, inks, press settings and substrate behaviour can affect the final result, even when the artwork remains unchanged.
24. Is a sudden break in a gradient always caused by the artwork?
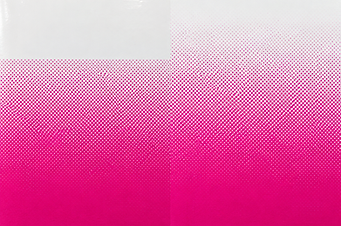
No. The artwork should be checked, but it is also necessary to examine the minimum printable dot, compensation curves, plate manufacturing and reproduction on press. Identifying the stage at which the tonal transition disappears helps determine the appropriate correction.
25. Can surface micro-screening compensate for a clogged anilox roller?
No. Surface micro-screening cannot replace proper maintenance and restoration of ink transfer conditions. Comparing different surface screening textures is only meaningful when ink transfer is sufficiently stable and properly documented.
26. Why use staggered or cascading plate mounting?
Offsetting the repeats between lanes distributes the printing areas around the cylinder. This can produce more consistent contact and reduce bouncing that may cause banding or missing print. Its usefulness depends on the artwork layout and the behavior of the press.
27. How can I avoid a visible line at the plate seam?
The seam should be anticipated during prepress by considering pattern continuity, the cutting path, and the planned gap between the plate ends. The cut and mounting position should then be checked carefully. Depending on the artwork, a staggered cut can help improve continuity, although it cannot guarantee an invisible seam in every configuration.
28. Why is distortion compensation applied to the file before imaging the plate?
When the plate is wrapped around the cylinder, its printing surface stretches in the direction of rotation. A compensation factor, often referred to as distortion or anamorphic compensation, is applied to the file so that the expected dimensions are restored in print. It must match the plate thickness and mounting configuration used.
29. How can I maintain colour consistency across repeat print runs?
Keep the approved proof or printed reference, the correct file version, and the relevant production references: substrate, inks, anilox, plates, and mounting tapes. When restarting production, compare the current measurements and conditions with those from the previous run. This traceability helps identify deviations and target the necessary adjustments.
30. What is the purpose of press characterisation in flexographic printing?
Press characterisation involves printing and measuring a test chart under defined conditions, including the printing press, substrate, inks, anilox rollers and press settings. The results are used to establish appropriate tone compensation curves and colour profiles for that specific printing configuration.